Clay crafting is one of the most versatile, tactile, and rewarding artistic mediums. From air-dry clays that require no specialized kiln firing to polymer clays that cure right in your kitchen oven, clay allows makers to build functional home decor, sculptural accents, and wearable art with simple hand-building tools.
Creating refined, professional-grade clay crafts relies on mastering proper clay conditioning, structural support, surface smoothing, and archival sealing. Whether you are working with natural terracotta, self-hardening air-dry clays, or vibrant polymer formulas, these ten concepts offer creative techniques to elevate your crafting projects.
Here is a comprehensive guide to ten clay craft ideas, complete with material choices, curing specs, joining methods, and surface finishing strategies.
Technical Foundations: Selecting & Working with Clay Mediums
Before starting any hands-on sculpting, select the correct clay body and master fundamental hand-building rules:
1. Clay Types & Applications
- Air-Dry Clay: Self-hardening clay that cures at room temperature over 24 to 48 hours. Best for interior home decor, wall hangings, trinket dishes, and sculptural vases that do not hold water.
- Polymer Clay: PVC-based malleable clay that cures in a conventional home oven (typically at $230^\circ\text{F} – 275^\circ\text{F}$ / $110^\circ\text{C} – 135^\circ\text{C}$). Ideal for jewelry, hair accessories, small drawer pulls, and delicate figurines.
- Pottery / Stoneware Clay: Natural earth clays that require high-temperature kiln firings ($1900^\circ\text{F}+$ / $1000^\circ\text{C}+$) and ceramic glazes. Necessary for food-safe dishware and liquid-holding planters.
2. The Slip-and-Score Joining Method
To join two separate pieces of moist clay without cracking during drying, always use the slip-and-score method:
- Score: Scratch crisscross lines into both contact surfaces using a needle tool or fork.
- Slip: Apply a drop of liquid clay slip (clay mixed with water) or water onto the scored areas.
- Bind: Press the pieces together firmly and smooth the seam using a wooden modeling tool.
1. The Arch-Shaped Terracotta Wall Hanging
Embracing Mediterranean warmth, an arch-shaped clay wall hanging combines geometric slab-building techniques with raw terracotta textures for modern wall art.
Fabrication Steps & Technical Specs
- Recommended Clay: Air-dry terracotta clay or buff-colored self-hardening clay.
- Building Technique:
- Roll clay out evenly to a $1/4\text{-inch}$ thickness using a wooden rolling pin guided by two wooden depth strips.
- Cut out a large arched shape ($6\text{ inches wide} \times 10\text{ inches tall}$) using a sharp craft knife.
- Use straw tools or metal hole-punches to create hanging holes at the top and bottom edges.
- Allow the piece to dry flat on a wooden board for 48 hours, flipping every 12 hours to prevent warping.
- Finishing Touches: String natural jute cord through the top hole and attach handmade yarn tassels to bottom openings.
Design Tip: Lay a sheet of parchment paper over the wet clay slab before rolling to ensure a completely smooth surface free of canvas impressions.

2. The Speckled Ring Dish with Scalloped Edges
Perfect for nightstands and entry tables, a hand-formed catchall dish with delicate scalloped rim detailing provides stylish storage for daily jewelry.
Fabrication Steps & Technical Specs
- Recommended Clay: White air-dry clay mixed with fine granite flecks, or white polymer clay blended with crushed dried herbs for a speckled effect.
- Building Technique:
- Roll a ball of conditioned clay into a smooth flat circle roughly $5\text{ inches}$ in diameter and $1/8\text{-inch}$ thick.
- Press a scalloped metal cookie cutter gently around the perimeter, or shape subtle wave curves manually using thumb and forefinger pinch motions.
- Drape the flat disk inside a shallow ceramic bowl lined with plastic wrap to form a soft concave curve as it dries or bakes.
- Protective Finish: Apply two coats of clear gloss or satin varnish to seal against oil and ring scratches.

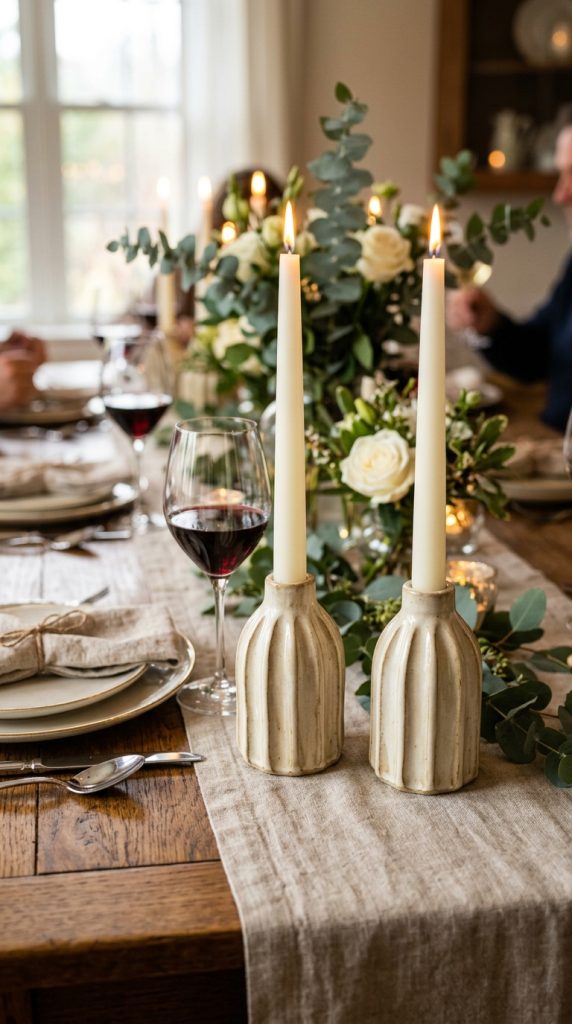
3. The Fluted Taper Candle Holder Duo
Fluted and ribbed pedestal candle holders bring sculptural elegance to dining tables, utilizing simple slab-wrapping over cardboard support tubes.
Fabrication Steps & Technical Specs
- Recommended Clay: High-density air-dry clay or oven-bake polymer clay.
- Building Technique:
- Roll out a long rectangular clay slab ($1/4\text{-inch}$ uniform thickness).
- Use a clay rib tool with grooved teeth to comb parallel vertical fluted lines across the slab surface.
- Wrap the fluted slab around a cardboard cylinder form, scoring and sealing the vertical seam on the backside.
- Form a thick, circular base disk and press the cylinder onto it firmly using the slip-and-score method.
- Safety & Sizing: Measure your taper candles carefully—ensure the top socket opening sits at $7/8\text{-inch}$ diameter to hold standard candles securely.
4. The Marbled Polymer Clay Arch Earrings
Lightweight and colorful, polymer clay allows makers to mix custom color formulas and marble textures to craft wearable statement jewelry.
Fabrication Steps & Technical Specs
- Recommended Clay: Polymer clay (such as Sculpey Premo or Fimo Professional).
- Building Technique:
- Roll three complementary clay colors (e.g., terracotta, cream, and sage green) into long snakes.
- Twist the snakes together, fold them in half, and roll them out again to create an organic marble swirl.
- Roll the marbled clay to $1/16\text{-inch}$ thickness and cut mini arch or circle shapes using tiny stainless steel jewelry cutters.
- Pierce small jump-ring holes near the top edges using a toothpick before baking.
- Curing Standard: Bake in a dedicated craft oven at $275^\circ\text{F}$ ($135^\circ\text{C}$) for 30 minutes per $1/4\text{-inch}$ thickness.

5. The Tactile Woven Basket Weave Bowl
Replicating traditional wickerwork using clay coils creates a decorative bowl with intricate open-grid patterns and rich tactile interest.
Fabrication Steps & Technical Specs
- Recommended Clay: Highly pliable polymer clay or air-dry clay with added fiber reinforcement.
- Building Technique:
- Extrude long, uniform clay coils ($1/8\text{-inch}$ diameter) using an clay extruder tool or smooth hand-rolling.
- Lay down vertical warp coils over an inverted glass bowl base covered in aluminum foil.
- Weave horizontal weft coils over and under the vertical warp lines, securing intersections with gentle pressure.
- Trim excess coil edges flush along the rim and finish with a braided top coil border.
- Curing & Release: Bake or dry the piece directly on the glass mold, removing the inner glass support once the clay has fully hardened.

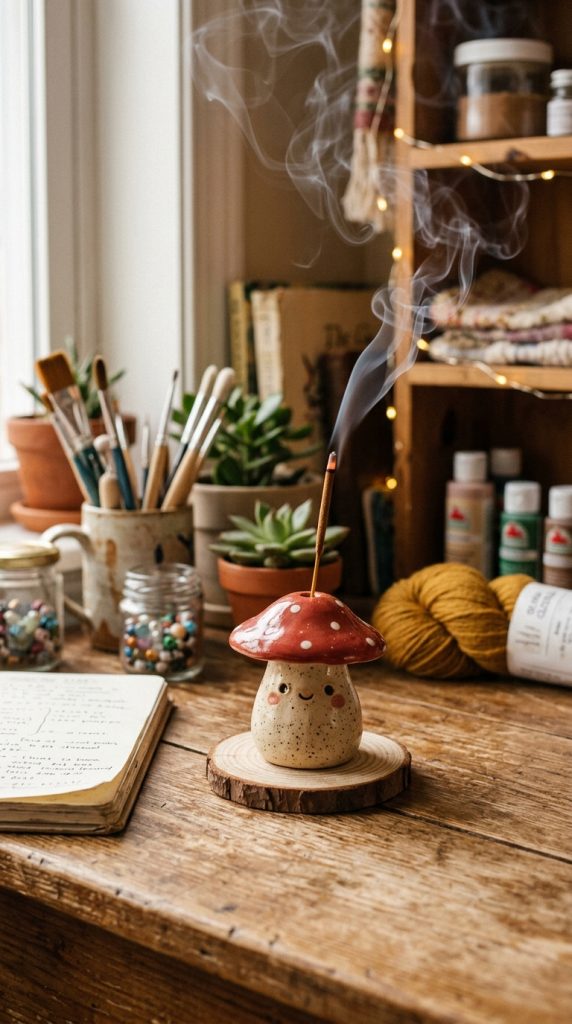
6. The Minimalist Mushroom incense Burner
Channeling organic forest themes, a small mushroom-shaped clay sculpture acts as a functional incense burner that captures falling ash cleanly.
Fabrication Steps & Technical Specs
- Recommended Clay: Air-dry terracotta clay or polymer clay.
- Building Technique:
- Sculpt a flat, circular base tray ($4\text{ inches}$ diameter) with slightly raised lip edges to catch incense ash.
- Hand-shape a small mushroom stem and cap, hollowing out a small internal chamber inside the stem base.
- Drill a narrow $1/16\text{-inch}$ angled hole into the top of the mushroom cap using a needle tool to hold stick incense handles.
- Attach the mushroom to the tray base securely using scoring and slip.
- Surface Decor: Paint cap details using opaque acrylic paints in classic fly agaric red and white dot patterns.
7. The Organic Plaster-Look Sculptural Vase Sleeve
Transforming plain cylindrical glass flower vases into high-end architectural art, a custom clay exterior sleeve brings modern plaster-like textures to tabletop displays.
Fabrication Steps & Technical Specs
- Recommended Clay: Fiber-reinforced air-dry clay.
- Building Technique:
- Wrap a sheet of parchment paper around a cylindrical glass vase.
- Roll out a large clay slab and wrap it around the parchment-wrapped glass form, joining the back seam neatly.
- Use wet fingers or a damp sponge to create organic, hand-sculpted ridges and horizontal wave textures across the outer surface.
- Allow the clay sleeve to dry completely, then slide out the inner glass vase to apply paints.
- Waterproofing Utility: The inner glass vase holds water safely while the outer clay sleeve provides aesthetic structure.

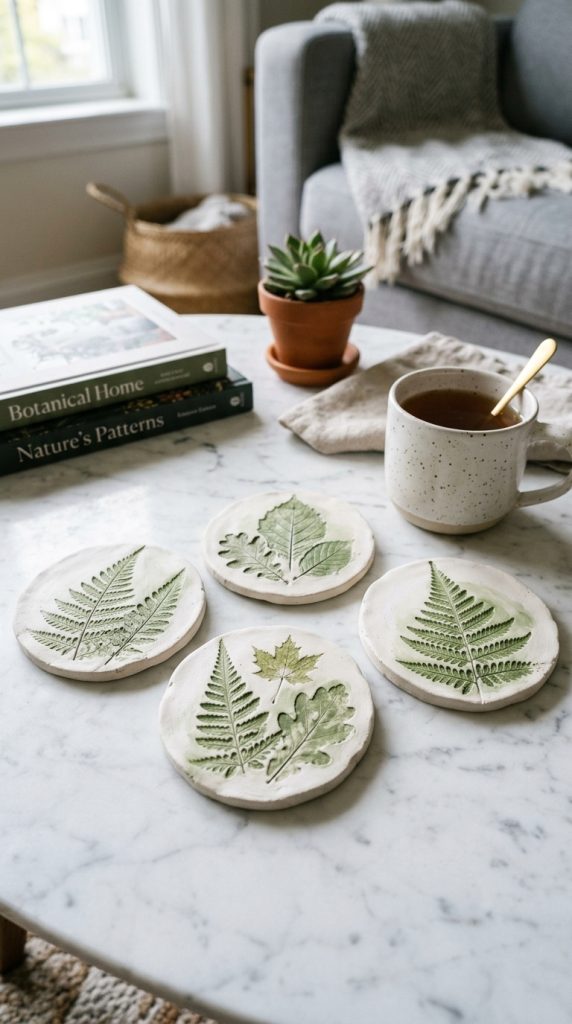
8. The Textured Botanical Leaf Print Coasters
Capturing natural plant textures in clay, botanical coasters feature delicate leaf, fern, or flower impressions painted with soft watercolor washes.
Fabrication Steps & Technical Specs
- Recommended Clay: Fine white air-dry clay or oven-bake polymer clay.
- Building Technique:
- Roll clay out into flat circles ($4\text{ inches}$ in diameter and $1/4\text{-inch}$ thick).
- Place fresh plant clippings (such as fern fronds, eucalyptus leaves, or lace flower sprigs) vein-side down onto the wet clay surface.
- Pass a wooden rolling pin over the leaves with firm, even pressure to imprint details.
- Carefully peel away the botanicals using tweezers to reveal deep natural leaf textures.
- Color Accents: Apply thinned acrylic paints or watercolor washes into the recesses, wiping high points clean with a damp sponge to highlight leaf veins.
9. The Modern Geometric Clay Drawer Knobs
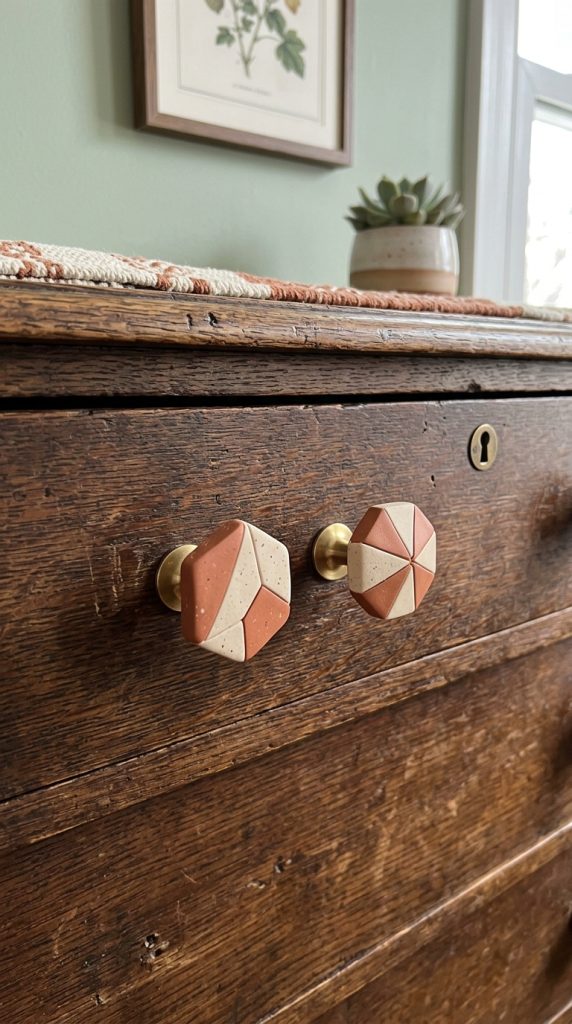
Upcycling plain furniture pieces with custom handmade clay hardware allows crafters to add tailored shapes, metallic highlights, and unique textures to dressers and cabinets.
Fabrication Steps & Technical Specs
- Recommended Clay: Heavy-duty polymer clay (such as Kato Polyclay or Sculpey Soufflé) for high durability.
- Building Technique:
- Condition clay thoroughly and press it into geometric shapes (like half-spheres, cubes, or arched pill shapes).
- Embed a long stainless steel cabinet screw (head-first) deep into the backside of the clay shape, smoothing clay back around the screw head anchor.
- Bake the hardware thoroughly according to clay manufacturer time and temperature guidelines.
- Durability Note: Ensure the clay fully encapsulates the screw head to prevent hardware twisting when installed onto drawer fronts.
10. The Checkerboard Pattern Clay Bead Garland
Draped across bookshelf ledges, coffee table books, or wooden mantels, a bead garland featuring hand-painted checkerboard patterns brings playful graphic style to home decor.
Fabrication Steps & Technical Specs
- Recommended Clay: Lightweight air-dry clay or polymer clay.
- Building Technique:
- Roll clay into uniform $1\text{-inch}$ spherical balls and wooden-style cylinder beads.
- Pierce a smooth center hole through each bead using a wooden skewer, rotating the skewer as it passes through to prevent squishing the round shape.
- Slide beads onto skewers and rest them over an oven-safe baking dish so they cure elevated without flat spots.
- Assembly: Once dry, paint geometric checkerboard or stripe patterns onto beads using acrylic paint pens, then string them onto thick cotton twine finished with end tassels.