A well-organized craft studio is more than just a tidy room—it is a functional sanctuary that fuels creative expression. Whether you specialize in paper crafting, sewing, vinyl cutting, mixed media painting, or jewelry making, managing hundreds of small tools, delicate materials, and varied supplies can quickly become overwhelming. Without an intentional organizational framework, valuable creative time is spent digging through chaotic bins rather than creating art.
Elevating your craft storage involves marrying ergonomic accessibility with clean visual harmony. By utilizing vertical wall space, clear container visibility, flexible mobile units, and dedicated sorting systems, you can transform chaotic supplies into a streamlined workspace.
Here is an interior design, spatial planning, and organizational guide to 10 creative craft storage ideas, complete with technical mechanics, material selections, and studio workflows.
Technical Fundamentals, Spatial Planning & Ergonomic Workflow
Before purchasing bins, shelves, or wall racks, analyzing your crafting workflow, storage capacities, and spatial layout guarantees your organizational system remains functional long-term.
          [ Step 1: Categorize Inventory & Map Ergonomic Reach Zones ]
                                      │
          [ Step 2: Maximize Vertical Wall Real Estate & Overhead Space ]
                                      │
          [ Step 3: Implement Clear or Color-Coded Modular Containers ]
                                      │
          [ Step 4: Integrate Task Lighting & Flexible Mobile Workstations ]
1. Ergonomic Reach & Accessibility Mapping
- Primary Zone (Immediate Desktop Reach): Reserve this prime real estate for daily tools—scissors, craft knives, bone folders, weeding tools, and active hot glue guns.
- Secondary Zone (Arm’s Length / Eye Level): Store frequently used inventory like acrylic paint bottles, vinyl rolls, stamps, ink pads, and ribbons in open wall shelves or clear desktop drawers.
- Tertiary Zone (Low or High Periphery): Utilize bottom cabinet drawers, high open shelves, or under-desk storage bins for bulk stock, seasonal fabrics, polyfill, and backup inventory.
2. Material Protection & Preservation Guidelines
- Paper & Fabric Preservation: Store specialty cardstock ($12\times12\text{-inch}$) and delicate textiles flat or upright in acid-free, moisture-sealed containers protected from direct UV sunlight to prevent yellowing, fading, or edge curling.
- Chemical & Adhesive Storage: Store liquid glues, resin compounds, solvent inks, and aerosol sprays in cool, dry compartments away from direct heat sources and safely out of reach of young children.

1. Wall-Mounted Framed Pegboard System
Maximize unused vertical wall space by mounting a heavy-duty pegboard enclosed in decorative timber molding to keep tools, paint bottles, and hanging baskets at eye level.
[ Mount Metal or Wood Pegboard ] ── Add Frame & Spacers ── [ Hang Hooks, Baskets & Spools ]
Technical Specs & Execution Workflow
- Core Materials: Heavy-duty metal or $0.25\text{-inch}$ tempered hardboard pegboard ($4\times3\text{ feet}$), wooden frame molding, metal peg hooks, hanging wire baskets, and shelf brackets.
- Assembly Mechanics: Mount the pegboard onto wall studs using $1\text{-inch}$ furring strip spacers behind the board to allow adequate back clearance for peg hooks. Paint the board in a soft pastel or clean neutral shade, then frame the edges with decorative wooden trim.
- Functional Layout: Group similar tools logically. Hang scissors, rulers, and hole punches on straight pegs, arrange paint bottles inside wire baskets, and slide spools of ribbon or decorative tapes onto horizontal dowel pegs.

2. Multi-Tiered Mobile Rolling Utility Cart
A flexible, space-saving hero piece that rolls your essential tools directly alongside your work table during creative sessions and slides neatly into a closet or corner when finished.
Technical Specs & Execution Workflow
- Core Materials: 3-tier metal rolling cart with locking swivel casters, magnetic storage cups, plastic drawer dividers, and side-hanging hook attachments.
- Execution Process: Assign a dedicated function to each tier of the cart:
- Top Tier: Place active project supplies, pen cups, and daily hand tools.
- Middle Tier: Arrange medium-sized jars or divided trays for embellishments, glues, and stamps.
- Bottom Tier: Store heavier equipment such as die-cutting machines, heat guns, or bulk paper packs.
- Mobility Advantage: The rolling cart easily transitions between sewing stations, cutting tables, or desk areas, providing quick access wherever you work.

3. Clear Acrylic Stackable Drawer Units
Eliminate visual clutter while maintaining instant inventory visibility by utilizing crystal-clear acrylic drawer modules stacked neatly on open shelves or desks.
Technical Specs & Execution Workflow
- Core Materials: Heavy-duty clear acrylic stackable drawer modules, removable silicone drawer liners, and adhesive typography label holders.
- Execution Process: Stack acrylic drawer modules vertically on your desk or open shelving units to optimize vertical height.
- Internal Sorting: Insert adjustable interior dividers to keep small supplies—such as beads, buttons, thread spools, or glitter jars—from sliding when opening drawers. Apply clean labels to the drawer fronts for instant identification.

4. Open-Cube Shelving with Custom Fabric Baskets
Combining open display shelving with woven or fabric storage bins provides a clean balance of visual charm and hidden clutter control.
Technical Specs & Execution Workflow
- Core Materials: Modular 8-cube or 12-cube laminate storage bookcase, fabric storage cubes, woven natural seagrass baskets, and acrylic shelf dividers.
- Assembly Mechanics: Anchor the cube bookcase securely to wall studs. Alternate between open display cubes and hidden basket cubes to create an engaging visual grid.
- Storage Allocation: Use open cubes for neatly stacked $12\times12\text{-inch}$ scrapbook albums, photo storage boxes, and decorative ceramics. Reserve basket cubes for bulky items like yarn skeins, fabric scraps, polyfill stuffing, or extra cable bundles.

5. Overhead Ribbon and Tape Dowel Dispenser
Keep colorful ribbons, baker’s twine, and decorative rolls tangle-free and instantly dispensable using wall-mounted wooden dowel rods.
Technical Specs & Execution Workflow
- Core Materials: Wooden curtain rod brackets or custom timber side supports, $0.5\text{-inch}$ wooden dowel rods, and a wall anchor kit.
- Assembly Mechanics: Mount wooden brackets vertically along an open wall section or inside a cabinet door. Slide spools of ribbon, baker’s twine, and decorative tapes onto the wooden dowels before resting them into the bracket grooves.
- Operational Design: Pull ribbon directly from the spool and snip at your desired length without unravelling the rest of the roll, keeping your workspace neat and efficient.

6. Vertical Vinyl & Paper Roll Wall Racks
Keep delicate vinyl rolls, transfer tapes, and large butcher paper sheets uncreased and visible using vertical wall-mounted storage racks.
Technical Specs & Execution Workflow
- Core Materials: Wall-mounted vinyl roll holders (silicone or acrylic cell grids), metal wire door-hanging racks, or hanging door pocket organizers.
- Assembly Mechanics: Mount the roll holder vertically to an open wall or hang it over the back of a craft room door using heavy-duty door hooks.
- Functional Integration: Slide individual vinyl rolls, transfer tapes, or wrapping paper tubes into dedicated slots sorted by material type or color spectrum. This preserves roll edges and prevents accidental creasing.

7. Glass Mason Jar Carousel for Small Embellishments
Upcycle glass jars or clear condiment carousels into a charm-filled desktop station for storing tiny craft findings, beads, and buttons.
Technical Specs & Execution Workflow
- Core Materials: 8 oz or 16 oz glass mason jars with screw lids, rotating lazy Susan turntable base, and waterproof label tags.
- Assembly Mechanics: Attach jar lids directly to the underside of a wooden shelf using small wood screws, or arrange jars neatly on a two-tier rotating lazy Susan turntable base.
- Sensory Appeal: Fill jars with color-sorted buttons, beads, pom-poms, sequins, and wooden embellishments. The clear glass provides instant visual recognition while adding nostalgic decorative charm to your studio desk.

8. Integrated Pull-Out Cutting Machine Station
Design a dedicated, dust-free cabinet space for digital cutting machines, heat presses, and large-format printers with built-in pull-out shelf slides.
Technical Specs & Execution Workflow
- Core Materials: Base kitchen cabinet or side Credenza, heavy-duty full-extension drawer slides ($100\text{ lbs}$ capacity), plywood shelf base, and an integrated power strip.
- Assembly Mechanics: Install heavy-duty drawer slides inside a base cabinet, mounting a sturdy plywood shelf on top. Place digital cutting machines or heat presses on the pull-out shelf.
- Utility Routing: Mount a multi-outlet surge protector along the interior back wall of the cabinet so machines remain plugged in and ready to slide out whenever needed.

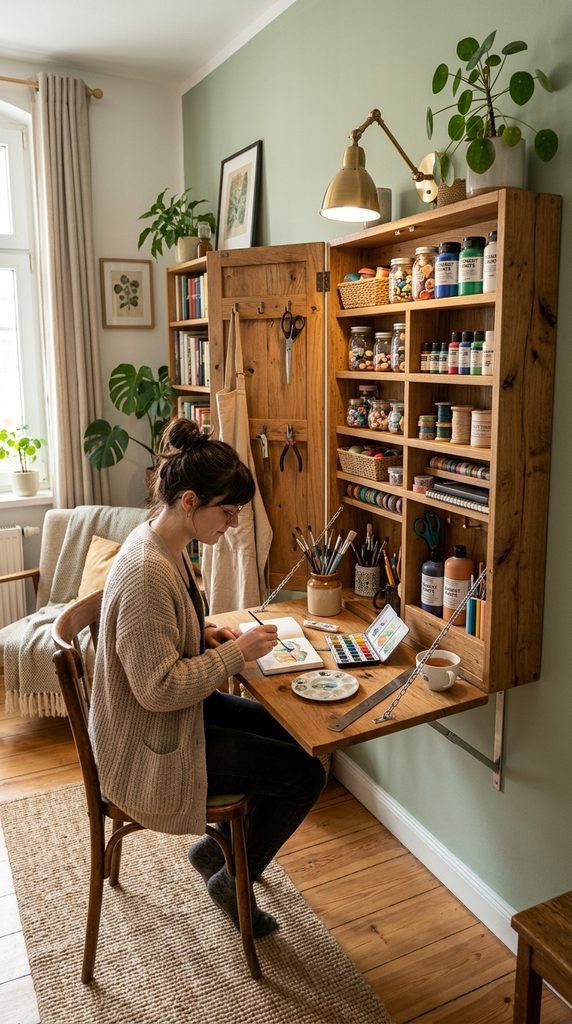
9. Wall-Mounted Flip-Out Worktable & Storage Cabinet
An ideal solution for dual-purpose guest rooms or compact spaces, this wall-mounted cabinet unfolds into a full-sized craft desk with built-in storage shelves.
Technical Specs & Execution Workflow
- Core Materials: Pre-built or custom timber wall-mount fold-down desk cabinet, heavy-duty drop-leaf hinges, latch lock mechanisms, and interior shallow shelves.
- Assembly Mechanics: Securely anchor the cabinet framework directly into wall studs at a standard desk height ($29\text{ to }30\text{ inches}$).
- Operation: Unlatch the front door panel and fold it down to create a stable, spacious craft table. The interior cabinet reveals shallow shelves stocked with paint tubes, brushes, and tool holders, providing a complete workspace that folds away neatly when finished.
10. Color-Coded Yarn & Fabric Wire Wall Grid
Transform your material stash into a striking wall art installation by displaying yarn skeins and fabric bundles along a metal wire grid.
Technical Specs & Execution Workflow
- Core Materials: Heavy-duty black or white metal wire grid panels ($2\times3\text{ feet}$), grid wall mounting clips, S-hooks, and wire hanging baskets.
- Assembly Mechanics: Secure wire grid panels to the wall using heavy-duty drywall anchors.
- Styling & Organization: Use metal S-hooks or wire baskets to hang skeins of yarn, fabric bundles, and embroidery hoops sorted in a smooth rainbow gradient. This keeps textiles off the floor and free from dust while serving as a bold visual focal point in your room.