Early childhood development thrives on sensory exploration, tactile play, and creative expression. Engaging toddlers—ages 1 to 3—in hands-on crafting projects supports fine motor skill development, hand-eye coordination, color recognition, and cognitive spatial awareness. However, successful toddler crafts require a deliberate design approach: projects must prioritize non-toxic materials, process-oriented exploration over rigid perfection, minimal mess management, and high tactile engagement.
Crafting with toddlers is not about producing a gallery-ready masterpiece; it is about providing open-ended opportunities to squash, smear, stick, stamp, and assemble safely.
Here is an early-childhood development, safety, and step-by-step crafting guide to 10 toddler craft ideas, complete with developmental benefits, sensory mechanics, mess-containment workflows, and staging guidelines.
Technical Fundamentals, Safety Protocols & Sensory Mechanics
Before introducing crafting materials to toddlers, establishing safety protocols, selecting age-appropriate non-toxic mediums, and preparing containment zones ensures a stress-free and enriching environment.
1. Material Safety & Non-Toxic Standards
- Edible-Safe / Non-Toxic Ingestion Safety: Toddlers frequently explore materials using their mouths. Always choose AP-certified non-toxic, washable, water-based paints, homemade flour-based play doughs, or natural food-dye solutions.
- Choking Hazard Parameters: Avoid small beads, loose sequins, uninflated balloons, or small buttons. Materials must measure larger than $1.25\text{ inches}$ in diameter to comply with safety thresholds for children under three.
2. Workspace Setup & Mess-Containment Mechanics
- Containment Trays: Utilize high-rimmed plastic baking trays, activity tubs, or shallow plastic storage bins to define each toddler’s crafting boundary and trap spills.
- Floor Protection & Surface Prep: Lay down washable vinyl floor mats, oilcloth splat mats, or painter’s drop cloths beneath crafting chairs to make cleanup effortless.

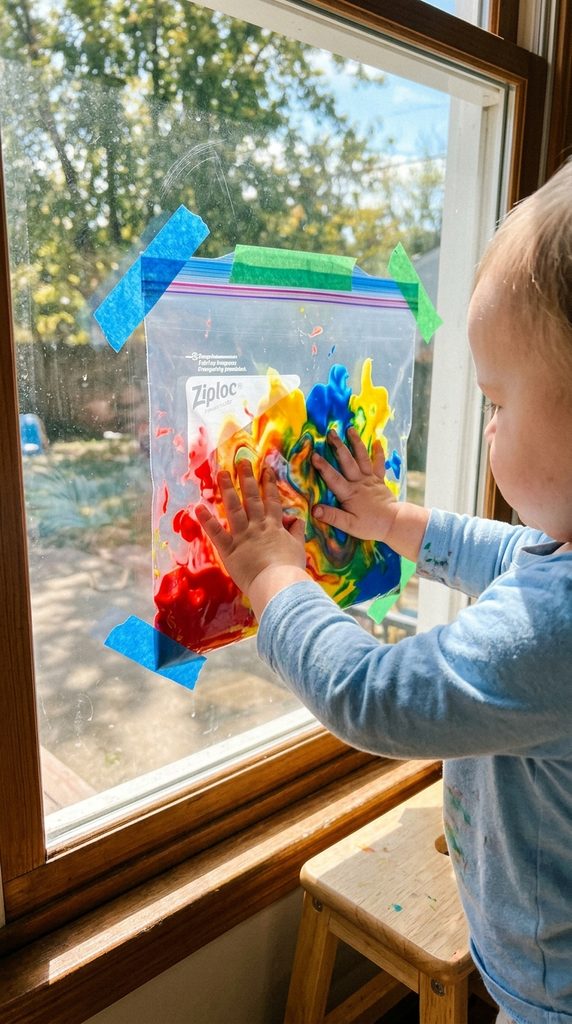
1. Mess-Free Ziploc Sensor Bag Painting
Allow toddlers to explore color mixing, squishing, and tactile painting without getting a single drop of paint on their hands or furniture.
Technical Specs & Execution Workflow
- Core Materials: Heavy-duty freezer ziploc bags ($1\text{ gallon}$ size), washable tempera paints (primary colors: red, yellow, blue), painters tape or masking tape, and heavy cardstock paper.
- Assembly Mechanics: Squirt 3 to 4 generous dollops of different colored washable tempera paint inside the ziploc bag. Slide a sheet of white cardstock inside if you wish to keep the print, or leave it clear.
- Execution & Play: Press out all excess air and seal the ziploc bag tightly. Reinforce the sealed edge with heavy painters tape and tape the bag flat onto a highchair tray, table, or sunlit window. Let the toddler press, squish, and drag their fingers to blend colors across the bag.
2. Homemade Natural Scented Play Dough Sculptures
A classic sensory classic that builds hand strength, finger dexterity, and spatial awareness through squishing, rolling, and stamping natural materials.
Technical Specs & Execution Workflow
- Core Materials: $2\text{ cups}$ all-purpose flour, $1\text{ cup}$ salt, $2\text{ tbsp}$ cream of tartar, $2\text{ tbsp}$ vegetable oil, $1.5\text{ cups}$ boiling water, natural food coloring, and wooden rolling pins or cookie cutters.
- Execution Process: Mix flour, salt, and cream of tartar in a bowl. Stir in oil, food coloring, and boiling water until a smooth dough forms. Knead for 5 minutes until soft and non-sticky.
- Tactile Play: Provide toddlers with chunky wooden rolling pins, silicone cookie cutters, and natural textures (like large pinecones or wooden stamps) to press patterns directly into the soft dough.

3. Contact Paper Sticky Wall Botanical Collage
Eliminate liquid glues entirely by constructing a vertical sticky wall canvas where toddlers can stick and reposition lightweight paper and natural items freely.
Technical Specs & Execution Workflow
- Core Materials: Clear contact paper roll, painters tape, tissue paper squares in bright colors, pressed leaves, large flower petals, and yarn scraps.
- Assembly Mechanics: Cut a $2\text{ft} \times 2\text{ft}$ square of clear contact paper. Peel off the backing paper to expose the sticky surface.
- Installation & Staging: Tape the contact paper to a wall or window at the toddler’s eye level, with the sticky side facing outward, using low-tack painters tape. Hand the toddler tissue paper shapes and dried flowers to press onto the wall to build a vibrant suncatcher collage.

4. Edible-Safe Yogurt Finger Painting
Ideal for younger toddlers who are still in the oral exploration phase, using vibrant, fruit-dyed yogurt as an entirely edible finger paint.
Technical Specs & Execution Workflow
- Core Materials: Plain Greek yogurt (thick consistency), natural food dyes or fruit powders (beet powder, blueberry juice, turmeric), and thick watercolor paper or heavy cardstock.
- Preparation Process: Divide plain Greek yogurt into small plastic bowls. Mix a few drops of natural food coloring or fruit powders into each bowl to create vibrant pastel shades of red, purple, and yellow.
- Sensory Execution: Place a sheet of heavy cardstock inside a shallow plastic tray. Scoop small portions of colorful yogurt onto the tray and allow the toddler to swirl, paint, and taste freely without safety concerns.

5. Paper Plate Rainbow Tissue Paper Craft
Develop fine motor pincer grasps by tearing, crumpling, and gluing soft tissue paper pieces onto pre-cut paper plate bases.
Technical Specs & Execution Workflow
- Core Materials: Uncoated paper plates, colorful tissue paper sheets, non-toxic washable glue sticks, safety scissors (for adult prep), and cotton balls.
- Prep Mechanics: Cut an uncoated paper plate in half to create an arch shape. Pre-tear or let the toddler rip tissue paper sheets into small $2\text{-inch}$ squares.
- Assembly Process: Show the toddler how to swipe a washable glue stick across the paper plate arch. Assist them in pressing crumpled tissue paper squares onto the plate to build a textured rainbow, finishing with fluffy cotton ball clouds glued along the base.

6. Giant Cardstock Box Canvas Painting
Transform clean, discarded cardboard appliance boxes into immersive 3D canvas forts where toddlers can paint inside or outside without boundary restrictions.
Technical Specs & Execution Workflow
- Core Materials: Large cardboard appliance box, washable tempera paint, chunky foam paintbrushes, paint rollers, and paper plates for paint palettes.
- Setup Mechanics: Cut open the top of a large cardboard box to create an open-top play fort, or lay it flat on a outdoor lawn surface.
- Sensory Application: Pour bright washable tempera paints onto sturdy paper plates. Equip the toddler with oversized foam rollers or stubby paintbrushes, allowing them to use large arm movements to cover giant vertical cardboard walls.

7. Bubble Wrap Footprint Stamping Art
Encourage gross motor movement, balance, and tactile sensory exploration by turning textured bubble wrap into wearable stamping boots.
Technical Specs & Execution Workflow
- Core Materials: Large-bubble wrap rolls, painters tape, washable tempera paint, large roll of white butcher paper, and a damp washcloth for quick cleanup.
- Prep Mechanics: Unroll a $6\text{-foot}$ strip of white butcher paper along the floor and tape the edges securely to the ground. Wrap smooth sections of bubble wrap around the toddler’s bare feet or shoes, securing them snugly around the ankles with painters tape.
- Stamping Process: Coat the bottom of the bubble wrap feet with washable paint using a foam brush. Guide the toddler to walk, stomp, and march across the butcher paper, producing textured bubble prints along the pathway.

8. DIY Nature Impression Clay Keepsakes
Capture tiny handprints or natural outdoor treasures inside soft, air-dry clay disks to create timeless keepsakes and decorative ornaments.
Technical Specs & Execution Workflow
- Core Materials: Non-toxic white air-dry modeling clay, wooden rolling pin, circular cookie cutter or plastic bowl rim, collected garden items (twigs, leaves, ferns), and a straw.
- Assembly Mechanics: Roll out a piece of air-dry clay to $0.5\text{-inch}$ thickness. Cut out a smooth circular disc using a round cookie cutter.
- Impression Process: Guide the toddler to press collected leaves, twigs, or their own palm firmly into the damp clay surface. Remove the natural items carefully to reveal detailed impressions. Punch a hole near the top using a drinking straw and allow to air-dry for 24 to 48 hours.

9. Cardboard Tube Stamping Monsters & Figures
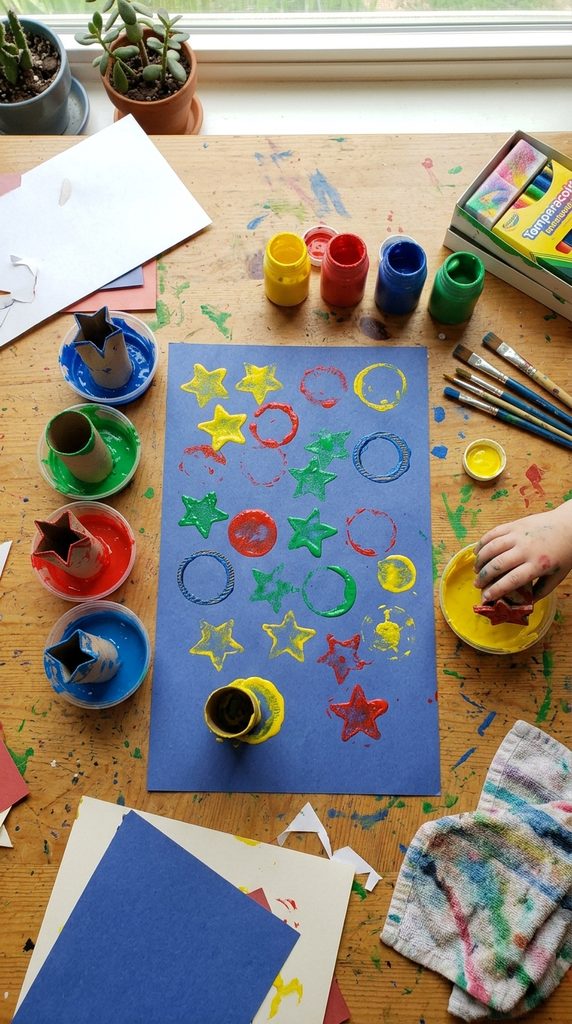
Upcycle household paper towel and toilet paper tubes into chunky stamping tools that toddlers can grip easily to print geometric patterns onto paper.
Technical Specs & Execution Workflow
- Core Materials: Cardboard paper tubes, washable tempera paint, shallow pie tins, heavy construction paper, and large googly eyes ($1.5\text{ inches}$ diameter) with glue sticks.
- Prep Mechanics: Cut cardboard tubes into $4\text{-inch}$ lengths. Snip small fringe cuts or bend the ends of the tubes into heart, square, or triangle shapes to create custom stamps.
- Printing Process: Pour shallow layers of tempera paint into pie tins. Show the toddler how to dip the shaped end of the cardboard tube into the paint and stamp repeating patterns onto construction paper. Finish by gluing large, non-choking googly eyes onto the stamped shapes.
10. Floating Sponge Water Painting on Sidewalks
A completely mess-free outdoor craft that uses clean water, cellulose sponges, and sun-warmed concrete sidewalks as a disappearing canvas.
Technical Specs & Execution Workflow
- Core Materials: Large household cellulose sponges, chunky water paintbrushes, small plastic buckets filled with water, and an outdoor concrete patio or sidewalk.
- Prep Mechanics: Cut household sponges into large star, circle, or animal silhouettes that fit comfortably into a toddler’s small hand.
- Execution & Science: Fill small buckets with clean water outdoors. Toddlers dip sponges or large brushes into the water and stamp or paint dark water patterns onto dry concrete, watching in fascination as the sun evaporates the water drawings over time.